Saturday, November 21, 2009
Friday, November 13, 2009
How to use the Alternate Configuration functionality to establish multiple-network connectivity
Set up a wireless network without a router
Wireless networks are helpful because they let you use your computer and connect to the Internet anywhere in your home or office. However, most wireless networks use a wireless router, which can be expensive. If you have more than one computer, you can set up a wireless network without buying a wireless router and save yourself some money.
In a traditional wireless network, a wireless router acts as a base station, much like the base station for cordless phones. All wireless communications go through the wireless router, allowing nearby computers to connect to the Internet or to each other.

Ad hoc wireless networks work more like walkie-talkies, because the computers communicate directly with each other. By enabling Internet Connection Sharing on one of the computers, you can share Internet access.

Ad hoc networking might seem like a much smarter alternative to using a wireless router, but it does have a couple of disadvantages:
| • | If the computer connected to the Internet is shut down, all computers that are part of the ad hoc network lose their Internet access. |
| • | To connect to the Internet, one computer always needs a wired network connection. |
To connect your computers to the Internet using an ad hoc wireless network, follow these high-level steps (described in more detail later in this article):
1. | Enable Internet Connection Sharing on the Internet-connected computer. You can skip this step if you don't need to access the Web. |
2. | Set up the ad hoc wireless network on the Internet-connected computer. |
3. |
How to enable Internet Connection Sharing
On networks with wireless routers, the router has the important job of forwarding communications from the computers on your home network to the Internet. On ad hoc networks, you must designate one computer to serve this role. The computer you choose must have a wired connection to the Internet, and it should be left on whenever you want to be able to use your other computers.
To set up an ad hoc wireless network that allows computers to share an Internet connection without a router
1. | If necessary, install a wireless network adapter. |
2. | Click Start, and then click Control Panel.
|
3. | Under Pick a category, click Network and Internet Connections.
|
4. | Under or pick a Control Panel icon, click Network Connections.
|
5. | Right-click your wireless network connection, and then click Properties.
|
6. | In the Wireless Network Connection Properties dialog box, click the Wireless Networks tab.
|
7. | On the Wireless Networks tab, under Preferred networks, click Add.
|
8. | In the Wireless network properties dialog box, on the Association tab, type the name of your ad hoc wireless network in Network name (SSID) box (shown in step 10). For example, you could name your wireless network MyHomeNetwork. |
9. | Clear the The key is provided for me automatically check box and select the This is a computer-to-computer (ad hoc) network check box. |
10. | Create a 13-digit password and type it in both the Network key and Confirm network key boxes. For the best security, include letters, numbers, and punctuation. Then click OK.
|
11. | Click OK again to save your changes.
|
If the computer you want to add to your network does not have built-in wireless network support, install a wireless network adapter.
Windows XP automatically detects the new adapter and notifies you that it found a wireless network.

Now connect your computer to your wireless network
Note: These steps apply only if you're using Windows XP Service Pack 2 (SP2). If you haven't installed SP2, visit Microsoft Update to install it before connecting to the ad hoc network.
1. | Right-click the Wireless Network icon in the lower right corner of your screen, and then click View Available Wireless Networks.
Note: If you run into any problems, consult the documentation that came with your network adapter. Don't be afraid to call the manufacturer's technical support department for help. |
2. | The Wireless Network Connection window appears and displays your wireless network listed with the SSID you chose. If you don't see your network, click Refresh Network List in the upper left corner. Click your network, and then click Connect in the lower right corner.
|
3. | Windows XP prompts you to enter a key. Type your encryption key in both the Network key and Confirm network key boxes, and then click Connect.
|
Windows XP shows its progress as it connects to your network. After you're connected, you can close the Wireless Network Connection window.
Repeat these three steps on each computer that you want to connect to your ad hoc wireless network.
Now you're ready to browse the Web wirelessly, from any computer you add to your home network.
Set up a wireless network
Choose your wireless equipment
The first step to setting up a wireless network is to make sure you have the equipment you need. You'll need at least two network components: a wireless router and a wireless network adapter.
If you're buying a new router, look for one with the Windows logo. This ensures that the router will work reliably in Windows XP, and if you decide to upgrade, it will work in Windows Vista and Windows 7 as well. Networking in Windows 7 has been simplified and improved. To learn more, see Windows 7 features.
| • | Wireless router. Converts the signals coming across your Internet connection into a wireless broadcast, sort of like a cordless phone base station. Be sure you get a wireless router and not a wireless access point. For more information about choosing a wireless router, read Choosing the type of network to install.
|
| • | Wireless network adapter. Connects your computer to your wireless router. If you have a newer portable computer, you might already have wireless capabilities built in. To find out if you have wireless networking built in, and for more information about buying and installing a network adapter, read Install a wireless network adapter. Make sure you have an adapter for every computer on your network.
|
You can also connect your digital video recorder (DVR) or media extender to your wireless network. If the device has a wired network connection, use a wireless game adapter for a single device or a wireless bridge to connect multiple devices. Wireless game adapters aren't just for games—they'll work with anything that has a wired network port. For information about connecting game consoles to your network, read Connect an Xbox or Xbox 360 to your network.
Connect your wireless router
1. | Before you go any further, print these instructions. You'll be temporarily disconnected from the Internet, so while you're doing the installation, you won't be able to get to this page to refer to the instructions. | ||||
2. | Locate your cable modem or DSL modem, and unplug it from its port to turn it off.
| ||||
3. | If you currently use a dial-up connection to connect to the Internet, set up your wireless network using ad hoc Internet sharing. | ||||
4. | Connect your wireless router to your modem. Your modem should stay connected directly to the Internet. Later, after you've hooked everything up, your computer will wirelessly connect to your router, and the router will send communications through your modem to the Internet.  To connect your router to your modem:
| ||||
5. | Plug in your router. After a minute or two, the Internet, WAN, or WLAN light on your router should light up, indicating that it has successfully connected to your modem.
|
There are two ways to configure your wireless router: using Windows Connect Now and manually.
| • | If your router supports Windows Connect Now, you don't need to continue reading this article. You can configure your wireless router and Windows XP computers quickly and easily by following the instructions in Using Windows Connect Now technology. |
| • | If you don't have a router that supports Windows Connect Now, you need to manually configure your router: |
1. | Using the network cable that came with your wireless router, temporarily connect your computer to one of the wired network ports on your wireless router (any port that isnt labeled Internet, WAN, or WLAN). | ||||||||||||||||||||
2. | Turn your computer on; it will automatically connect to your router.
| ||||||||||||||||||||
3. | Open Microsoft Internet Explorer and type in the address to configure your router, as described in your router's instruction manual.
| ||||||||||||||||||||
4. | Create a password if a prompt appears. The address and password you use will vary depending on what type of router you have, so refer to the instructions included with your router.
Tip: As a quick reference, this table shows the default addresses, user names, and passwords for some common router manufacturers.
| ||||||||||||||||||||
5. | Internet Explorer will show your router's configuration page. Most of the default settings should be fine, but you should configure three items:
|
The exact steps you follow will vary depending on the type of router you have. After each configuration setting (SSID, WEP, and administrative password), be sure you click Save Settings, Apply, or OK to save your changes.
Note: The pictures in this section show Linksys wireless equipment. Equipment from other manufacturers will vary in appearance. For example, to save your settings in Linksys, you click Save Settings. Other equipment may have a different display, and you may have to click Apply or OK.
SSID or naming your network
A service set identifier, or SSID, identifies your network. Choose a unique name that you're confident none of your neighbors will use, but don't specify your name or your address. This is not a security tool, so you don't need to make the SSID complex.

Protecting your wireless network
Help prevent uninvited guests from connecting to your wireless network. To learn how, read Implement WPA2-Personal wireless security on a Windows XP SP2-based computer.
Administrative password
The last configuration change you should make is to the administrative password. Just like any other password, the administrative password should not be a word you can find in the dictionary, and it should be a combination of letters, numbers, and symbols. Be sure you can remember this password, because you'll need it if you ever have to change your router's settings.
Tip: Write down your passwords on a piece of paper and store them in your home safe if you have one. If you don't have a home safe, store your passwords with your other important family documents. If you think of your passwords as important documents, you'll always know where to find them.

Now that you have configured your wireless router, named your wireless network, protected it, and assigned an administrative password, you are ready for the last step:
| • | Disconnect the network cable from your computer—you'll be able to connect wirelessly from now on. |
Connect your computers and devices
If your computer does not have wireless network support built in, you can install a wired or a wireless network adapter. Windows XP will automatically detect the new adapter and might prompt you to insert the CD that came with it. The on-screen instructions will guide you through the configuration process.
Windows XP Service Pack 2 (SP2) is not required for wireless networking, but it does make setting one up much easier. SP2 also helps protect you against viruses, worms, and other Internet intruders. To install SP2, visit Microsoft Update. The steps below apply only if you're using SP2. Windows XP will show an icon with a notification that says it has found wireless networks.

To connect your computer to your wireless network
1. | Right-click the wireless network icon in the lower right corner of your screen, and then click View Available Wireless Networks.
Note: If you run into problems, consult the documentation that came with your network adapter. Don't hesitate to call the manufacturer's technical support number for help. |
2. | The Wireless Network Connection window appears and displays your wireless network listed with the SSID you chose. If you don't see your network, click Refresh network list in the upper left corner. Click your network, and then click Connect in the lower right corner.
|
3. | Windows XP prompts you to enter a key. Type the encryption key that you wrote down earlier in both the Network key and Confirm network key boxes, and then clickConnect.
|
4. | Windows XP will show its progress as it connects to your network. If the Wireless Network Connection window continues to show Acquiring Network Address, you may have mistyped the encryption key—click Cancel and return to step 3. |
After you're connected, you can close the Wireless Network Connection window. Now you're ready to browse the Web wirelessly. You can also create a wireless network in your home that connects your computers, printers, cameras, games, and other accessories for easy access and enjoyment.
Thursday, November 12, 2009
Windows XP Task Manager
Those who have previously used Windows 98/Me are probably familiar with the "3-finger salute". This is the keyboard combination Ctrl+Alt+Delete that was used to bring up the "Close Program" dialog box. As the name implies, its only function was to close programs that got hung up, or sometimes to close Windows itself when a program crash locked up the system. In Windows XP, a much more versatile utility called the Task Manager is available.
Opening Windows XP Task Manager
Task Manager can be opened with the old "3-finger salute" on XP systems that are not joined to a domain and that use the Welcome Screen for logging on. Otherwise, Ctrl+Alt+Delete opens the Windows Security dialog box, which contains a Task Manager button. A different shortcut, Ctrl+Shift+Esc can be used in all cases. Task Manager can also be opened by going to Start-Run and type taskmgr . Yet another route is to right-click on an empty spot in the Taskbar and then choose "Task Manager" from the context menu.
How to create a shortcut to Task manager
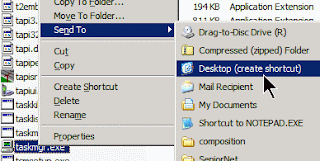
Note that Task manager is not normally available from the programs list in the Start menu although you can create a shortcut there if you wish. One way to create a shortcut is to use Windows Explorer to find the file
\Windows\system32\taskmgr.exe
Right-click on the file and choose "Send To- Desktop (Create Shortcut)". (Figure below)
If you like shortcuts on the Desktop, you can leave it there. Otherwise, move it to the folder of your choice in \Documents and Settings\{User Name}\Start Menu. If it is to be available to all users, move it to a folder in \Documents and Settings\All Users\Start Menu\ . Note that Administrator rights are required to use some functions of Program Manager.
Using Task Manager
When Task Manager is first opened the dialog box shown below appears. It has four tabs. (There is also a Users tab if you are using Fast User Switching but I prefer to turn this off.) The default tab "Applications" is a list of the applications that are running in the foreground. These are programs that you can see on the desktop or on the taskbar and that are not running hidden in the background.
All the tab windows have information at the bottom showing the number of processes that are running, how much the CPU is being used, and how much memory resources are committed. The Applications window also has a button "New Task" in the lower right corner that is discussed below
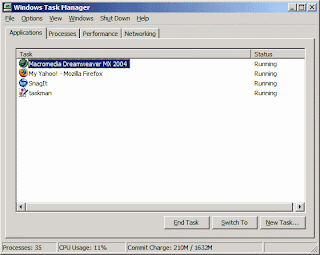
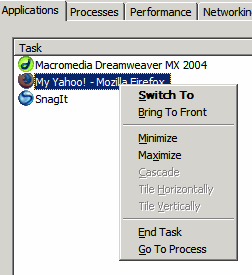
A common use for Task Manager is to end a program that has become frozen or hung. Select an application and click the button "End Task". Another way is to right-click on a program entry, which brings up the context menu shown below. It includes an entry "End Task". There is also an entry "Go to Process" that will take you to the actual process that is running a selected program. A new window will open listing all the processes.
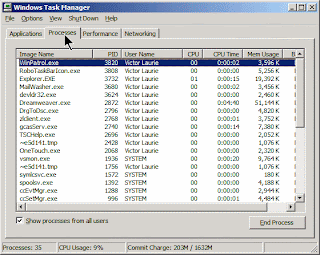
The dialog box for processes will also open when the tab "Processes" is selected as is shown in the next figure. A much larger group appears that includes many background services. Here you can see how much memory and CPU time each process is taking. This information can be enlightening and can help you decide if something is causing your computer to slow down. Processes can be ended either by a right-click menu or the button "End Process" that is in the lower right corner of the dialog box.
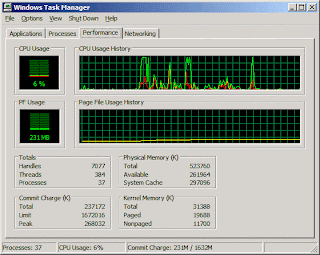
CPU and memory usage can vary over a substantial range. The "Performance" tab allows graphs of usage to be seen. An example is shown in the next figure. This can be useful in tracking down resource hogs.
How to Unfreeze a Hung Computer
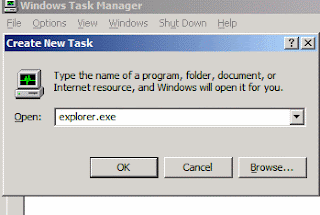
Task Manager has the very useful capability to open a new program. It is the equivalent of having Start-Run available and is obtained by clicking the button "New Task..." on the Applications tab window that is mentioned above. The resulting interface is shown in the figure below.This feature may seem redundant but it can come in very handy if a crash or badly written program freezes Windows Explorer, thus making the Desktop inoperable. Usually, Task Manager will still be functional and, even with no Desktop, programs can still be opened. In particular, the Desktop can be restored. First go to the "Processes" tab and find the entry for "Explorer.exe". Highlight the entry and click the "End Process" button. It may not respond immediately since there is usually a 20-second wait for hung processes to clean themselves up. Close any other hung processes. (They will show a status "Not responding".) Once Explorer.exe has been unloaded, the Desktop will disappear but, never fear, it is easily restored. Click the "Applications" tab and then the "New Task" button. As shown below, enter "explorer.exe" (no quotes) click "OK". The Desktop will reappear.
Wednesday, November 11, 2009
Using Safe Mode at startup
NOTE: Using System Restore in Safe Mode to return the computer to a previous restore point cannot be undone.
1. Press the power button to turn on the computer.
2. At the first screen, press the f8 key repeatedly every half of a second until the Windows Advanced Boot Options screen displays.
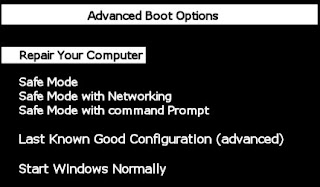
3. Press the down arrow key until Safe Mode with Command Prompt is selected, and then press enter . Wait while Windows loads system files. The Windows log on screen appears.
4. At the command prompt, enter rstrui.exe , and then press enter . Wait a few moments for the System Restore window to open.
5. Follow the on-screen instructions to perform a system restore.
You have now returned the computer to a previous restore point using Safe Mode with Command Prompt.
Tuesday, November 10, 2009
Begin The HP Recovery Process
Next, you'll want to unplug any external devices, such as USB printers, cameras or scanners. These devices could interfere with the recovery process.
There are a couple of ways to reach the recovery screen. The easiest will be to tap the F10 key repeatedly when booting the PC. This will take you to a screen to begin the process. Or, once in Windows, you can go to Start>All Programs>HP Tools>HP PC System Recovery.
Follow the onscreen instructions. The process may take an hour or two depending on the size of the hard drive. Once complete, your HP computer should be reverted to the original factory condition.
Vista Startup Repair: FAQ
Startup Repair is a Windows Vista recovery tool that can fix certain problems, such as missing or damaged system files, that might prevent Windows from starting correctly. When you run Startup Repair, it scans your computer for the problem and then tries to fix it so your computer can start correctly.
Startup Repair is located on the System Recovery Options menu, which is on the Windows Vista installation disc. If your computer manufacturer has preinstalled recovery options, Startup Repair might also be installed on your hard disk. If your computer does not include Startup Repair, your computer manufacturer might have customized or replaced the tool. Check the information that came with your computer or go to the manufacturer's website.
How do I use Startup Repair?
If you have a Windows Vista installation disc, you need to restart (boot) your computer using the installation disc. If you do not restart your computer from the disc, the option to repair your computer will not appear.
If you have a Windows Vista installation disc:
1. Insert the installation disc.
2. Restart your computer.
Click the Start button , click the arrow next to the Lock button, and then click Restart.
3. If prompted, press any key to start Windows from the installation disc.
Note:
If your computer is not configured to start from a CD or DVD, check the information that came with your computer. You may need to change your computer's BIOS settings. For more information, see BIOS: frequently asked questions.
4. Choose your language settings, and then click ,Next.
5. Click Repair your computer.
6. Select the operating system you want to repair, and then click Next.
7. On the System Recovery Options menu, click Startup Repair. Startup Repair might prompt you to make choices as it tries to fix the problem, and if necessary, it might restart your computer as it makes repairs.
If Startup Repair is a preinstalled recovery option on your computer:
1. Remove all floppy disks, CDs, and DVDs from your computer, and then restart your computer.
Click the Start button , click the arrow next to the Lock button, and then click Restart.
2. Do one of the following:
* If your computer has a single operating system installed, press and hold
the F8 key as your computer restarts. You need to press F8 before the Windows
logo appears. If the Windows logo appears, you will need to try again by
waiting until the Windows logon prompt appears, and then shutting down and
restarting your computer.
* If your computer has more than one operating system, use the arrow keys
to highlight the operating system you want to repair, and then press & hold F8.
3. On the Advanced Boot Options screen, use the arrow keys to highlight Repair your computer, and then press ENTER. (If Repair your computer is not listed as an option, then your computer does not include Startup Repair as a preinstalled recovery option.)
4. Select a keyboard layout, and then click Next.
5. Select a user name and enter the password, and then click OK.
6. On the System Recovery Options menu, click Startup Repair. Startup Repair might prompt you to make choices as it tries to fix the problem and, if necessary, it might restart your computer as it makes repairs.
Are there problems that Startup Repair cannot fix?
Start up Repair cannot fix hardware failures, such as a failing hard disk or incompatible memory, nor does it protect against virus attacks. Startup Repair is not a backup tool, so it cannot help you recover personal files, such as photos or documents. To help protect your computer, back up your system and files regularly. For more information, search for "backup" in Windows Help and Support.
Start up Repair is not designed to fix Windows installation problems. For more information, see Troubleshoot Windows installation problems.
What if Startup Repair can't fix my problem?
If repairs are not successful, you'll see a summary of the problem and links to contact information for support. Your computer manufacturer might include additional assistance information.


